Tag: recipe

Lemon Drizzle Cupcakes

Cupcakes are handheld treats that can make any celebration even more spectacular. If guests expect the standard flavors of chocolate, vanilla or even red velvet, change things up with a sunny surprise: lemon!

Enjoy this recipe for “Lemon Drizzle Cupcakes” from “Jane’s Patisserie” (Sourcebooks) by Jane Dunn. Anything with sweet drizzle is a hit, and these cupcakes deliver plenty of lemony flavor in every bite.

Lemon Drizzle Cupcakes

Makes 12

Cupcakes:

1/2 cup butter or baking spread

1/2 cup caster sugar

3 eggs

1 cup self-raising flour

Zest of 1 lemon

Drizzle:

Juice of 2 lemons

5 1/2 tablespoons caster sugar

Lemon Buttercream:

1/2 cup unsalted butter, at room temperature

2 1/4 cups icing sugar

Juice of 1/2 lemon

Sprinkles

Lemon zest

Preheat the oven to 350 F and get 12 cupcake liners ready. Beat the butter with the sugar until light and fluffy. Add the eggs, self-raising flour and lemon zest and mix until combined. Spoon the mix evenly into the cupcake liners and bake for 18 to 22 minutes until they are baked through and springy to the touch.

Mix together the lemon juice and sugar for the drizzle in a bowl. Once the cupcakes are out of the oven, carefully spoon the drizzle over the cupcakes, then leave them to cool fully on a wire rack while you make the buttercream.

Beat the butter until smooth; this can take a couple of minutes. Add the icing sugar in two batches, beating well after each addition, then add the lemon juice and beat again.

Pipe or spread the buttercream onto your cupcakes, then sprinkle each one with some sprinkles and lemon zest.

Smoked Chicken Wings

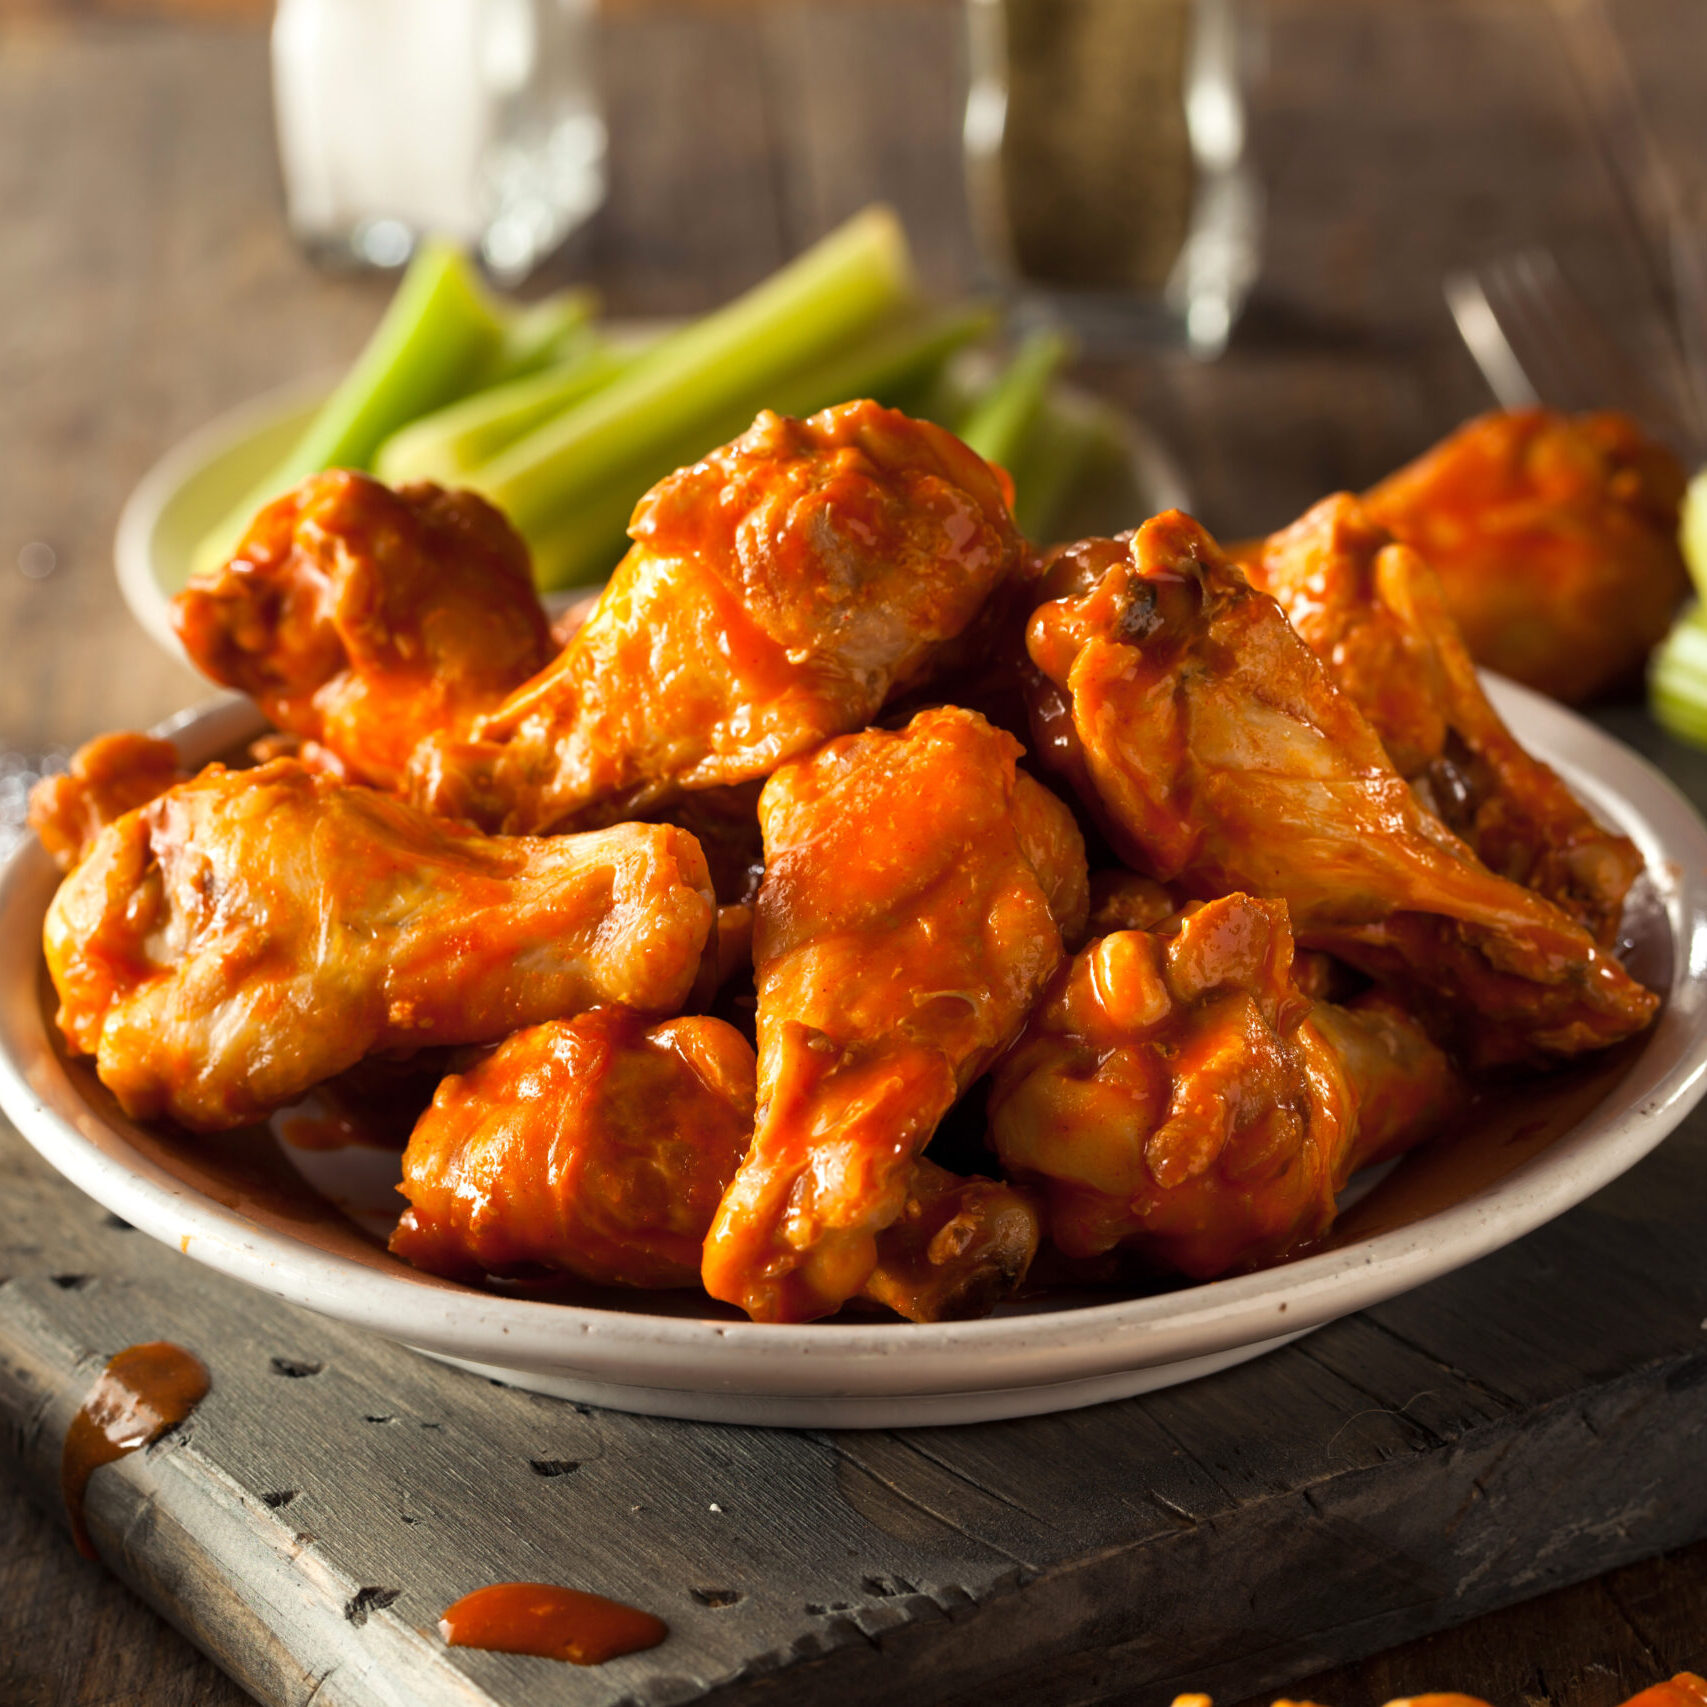
Super Bowl Sunday has become an unofficial holiday in the United States, where fans ranging from the diehard to the casual to those simply tuning in for the commercials and halftime show gather to enjoy a few fun-filled hours. Seasoned party hosts know that food features as prominently as football and fun come Super Bowl Sunday. Guests may expect a few staples, including chicken wings. With that in mind, hosts can impress their guests by serving up this recipe for “Virgil’s Smoked Chicken Wings With Blue Cheese Dip” from Neal Corman’s “Virgil’s Barbecue Road Trip Cookbook” (St. Martin’s Press).

Virgil’s Smoked Chicken Wings With Blue Cheese Dip

Serves 4

Blue Cheese Dip

2 cups blue cheese crumbles, divided

1 cup mayonnaise

1/2 cup buttermilk

2 teaspoons hot sauce

1 teaspoon Worcestershire sauce

1/2 teaspoon kosher salt

1/4 cup finely chopped scallions

1/4 cup finely chopped celery

Marinade

1/2 cup vegetable oil

1/2 cup hot sauce

4 tablespoons Virgil’s Dry Rub (see below)

4 tablespoons granulated garlic

4 tablespoons granulated onion

Juice of 1/2 lemon

Wings

8 large chicken wings

1/2 cup Virgil’s Dry Rub (see below)

Sauce

10 tablespoons unsalted butter

1 teaspoon cornstarch

4 tablespoons white vinegar

3/4 cup hot sauce

1/4 teaspoon cayenne pepper

Virgil’s Dry Rub

Makes 5 to 51/2 cups

21/2 cups sweet paprika

1 cup granulated sugar

1/2 cup Texas-style chili powder

1/2 cup minced onion

1/2 cup granulated garlic

1/4 cup dried parsley flakes

6 tablespoons kosher salt

Combine all of the ingredients in a medium bowl and whisk together until completely incorporated. Transfer to a covered bowl with a tight-fitting lid. Store in a cool, dry place.

Directions:

1. To make the dip, combine 1 cup of the blue cheese, mayonnaise, buttermilk, hot sauce, Worcestershire sauce, and salt in the bowl of a food processor and blend on low until smooth.

2. Remove to a medium mixing bowl and fold in the rest of the blue cheese, scallions and celery, being sure to break up the larger blue cheese crumbles. Place in a covered container and refrigerate overnight.

3. Mix all the marinade ingredients in a large mixing bowl. Place the wings in a large container with a lid and pour the mixture over the wings. Toss until the wings are thoroughly coated. Cover and refrigerate for 2 days.

4. Preheat the grill or smoker to 245 F.

5. Spread out the wings on a sheet pan and wipe away any excess marinade. Sprinkle liberally with the dry rub, coating the wings all over.

6. Position the wings on the grill away from the direct heat of the coals or burners, and add hickory to the smoker or hickory chips on the coals or gas burners.

7. Cook the wings for about 3 hours, flipping every 30 minutes (their internal temperature should be about 165 F when cooked).

8. While the wings are cooking, cut the butter for the sauce into 1-inch cubes and refrigerate. Whisk the cornstarch into the white vinegar in a small bowl.

9. In a medium sauté pan over medium heat, bring the hot sauce to a simmer and whisk in the thickened vinegar. Return to a simmer, cook for 1 minute, and remove from the heat.

10. Add the cayenne and slowly whisk in the cold butter. Keep warm until serving.

11. Remove the wings from the smoker or grill and put half of them into a bowl, cover with the sauce, and toss. Repeat with the remaining wings and serve on a platter, with the blue cheese dip on the side.

Crockpot Beef Stew With Potatoes and Peas

The term “comfort food” can be used in reference to a host of dishes. Some see Mom’s homecooking as the ultimate comfort food, while others may insist hearty dishes that fill the belly are the only true comfort foods.

Regardless of one’s definition of comfort food, one characteristic many might agree about is that foods must provide more than mere sustenance to qualify for entry into this wide-ranging category. Beef stew certainly fits that criteria, as many feel nothing is more comforting on a cold winter day than a warm bowl of slow-cooked stew. As winter settles in, those looking for some slow-cooked comfort can try this recipe for “Crockpot Beef Stew With Potatoes and Peas” from Lines+Angles.

Crockpot Beef Stew With Potatoes and Peas

Makes 6 servings

2 pounds boneless stew beef

1 teaspoon coarse salt

1 teaspoon freshly ground black pepper

1/3 cup all-purpose flour

2 tablespoons olive oil

1 medium onion, peeled and finely chopped

2 celery ribs, rinsed, trimmed and sliced

2 cloves of garlic, peeled and pressed

2 cups baby carrots, sliced

6 small new potatoes, rinsed and cut into bite-sized pieces

6 ounces tomato paste

4 cups beef broth

2 tablespoons Worcestershire sauce

1 tablespoon dried parsley

2 cups frozen peas

1. Rinse the beef under cold running water and pat completely dry with paper towels. Using a sharp knife, cut the beef into generous bite-size pieces.

2. Combine the salt, pepper and flour. Place the cubed beef in a large resealable plastic storage bag. Add the seasoned flour and shake to thoroughly coat the beef with flour.

3. Heat the oil in a heavy bottomed skillet over medium heat. Add the flour-coated beef and brown on all sides.

4. Place browned beef in the crock pot. Add onions, celery, garlic, carrots, potatoes, tomato paste, beef broth, Worcestershire sauce, and parsley.

5. Cook on low for 10 hours or on high for 6 to 7 hours. About 30 minutes before serving, add the frozen peas, cover and continue cooking for an additional 30 minutes.

6. Ladle stew into individual serving bowls and serve.

Tip: Cooking time may vary depending on age and size of crockpot.

Pecan Pie

A Thanksgiving dinner table can be a sight to behold. For foodies and others who love the array of comfort foods on display comes the fourth Thursday in November, Thanksgiving is a day to circle on the calendar each year.

While a mouthwatering turkey and sides like mashed potatoes and stuffing garner the bulk of the attention on Thanksgiving, the dessert table also can be a tempting place to direct one’s eyes. Though no dessert is off limits on Thanksgiving, pie is a particularly popular option on Turkey Day. With that in mind, those tasked with crafting something for dessert this Thanksgiving can consider the following recipe for “Pecan Pie” courtesy of Lines+Angles.

Pecan Pie

Makes 8 servings

1 9-inch unbaked frozen deep dish pie shell, thawed

11/2 cups pecans, coarsely chopped

3 eggs, lightly beaten

1 cup light corn syrup

1/2 cup brown sugar

1 tablespoon molasses

2 tablespoons butter, melted

2 tablespoons flour

1/4 teaspoon salt

1 teaspoon pure vanilla extract

1. Preheat oven to 350 F.

2. Spread pecans along the bottom of the prepared pie shell.

3. In a large bowl, mix the remaining ingredients and pour over pecans. The pecans will rise to the surface of the pie.

4. Bake for 60 to 65 minutes until the filling has set. Pie is done when the center reaches 200 F. Pie center when lightly tapped should spring back. Remove pie from oven and let cool on a wire rack for at least 2 hours.

5. Serve.

Preparation time: 15 minutes

Cooking time: 1 hour, 5 minutes

Cooling time: 2 hours

Total time: 3 hours, 20 minutes

Fresh Peach Crumble Bars

Summer is a time of year when people can enjoy their pick of fresh fruit at farm stands, supermarkets and other retailers. Many fruit trees, plants and bushes are ready for harvest in the spring and summer, meaning there’s no limit to the number of delicious recipes one can whip up with these sweet offerings.

Peaches are a favorite ingredient in many different types of desserts, from cobblers to pies. But in this recipe for “Fresh Peach Crumble Bar,” peaches are presented as a cross between a cake and cookie. Enjoy this recipe, courtesy of Saving Room for Dessert, as adapted from AllRecipes.com.

Fresh Peach Crumble Bars

Yield 20

Crust/Crumb Topping:

1 cup granulated sugar

3 cups all-purpose flour

1 teaspoon baking powder

1/2 teaspoon salt

1/4 teaspoon ground cinnamon

1 cup unsalted butter cold, cut into cubes

1 large egg, lightly beaten

Peach layer:

1/2 cup granulated sugar

1 tablespoon cornstarch

1/4 teaspoon ground cinnamon

5 large peaches, peeled and diced

1 teaspoon fresh lemon juice

Icing:

1 cup powdered sugar

1/4 teaspoon almond extract

1 tablespoon milk (more or less for desired consistency)

Directions:

1. Preheat oven to 350 F if using a glass pan or dark metal pan, or 375 F for a light metal pan. Lightly grease or spray a 13 x 9-inch baking pan and set aside.

2. In a medium bowl, whisk together 1 cup of sugar, 3 cups of flour, baking powder, salt and cinnamon. Using a pastry cutter, blend in the butter until the mixture resembles coarse sand. Add the lightly beaten egg and mix until the dough starts to hold together, but is still crumbly. Gently press a little more than half the dough into the prepared pan. (Optional: Use a food processor to process these ingredients.)

3. In a large mixing bowl, whisk together the sugar, cornstarch and cinnamon. Add the diced peaches and toss to combine. Drizzle the lemon juice over the peaches and toss to coat. Pour the peach mixture over the crust and spread evenly.

4. Using your hands, press together handfuls of the remaining crumb topping to create clumps. Scatter the clumps and remaining crumbled topping over the fruit layer, leaving some peaches showing through.

5. If using a glass pan, bake at 350 F for 50 to 55 minutes or until lightly browned. If using a metal pan, bake at 375 F for 40 to 45 minutes. Cool completely, then chill before cutting and icing.

6. Whisk together the powdered sugar, almond extract and milk. Drizzle on the bars just before serving.

Enjoy Stuffed Burgers This Barbecue Season

Barbecue season has arrived, so soon people will be bonding in the backyard over hamburgers and hot dogs. Backyard barbecue season begins in spring and continues through summer and, where the weather allows, into fall. Barbecues are a perfect summertime soiree, as they’re usually laid back affairs and make use of the pleasant weather.

While it’s fun to expand your culinary horizons over the open flame of a grill, it’s important that you never forget the basics, especially when entertaining crowds who are no doubt looking forward to grilled burgers. Giving the masses what they want is good hosting, but you can still try your hand at a little experimentation when serving burgers at your next backyard barbecue. The following recipe for “Herb Cheese-Stuffed Garlic Burgers” from Andrew Schloss’ and David Joachim’s “Mastering the Grill” (Chronicle Books) provides the best of both worlds.

Herb Cheese-Stuffed Garlic Burgers

Makes 6 servings

2 pounds ground beef chuck, 85 percent lean

2 tablespoons chopped garlic

1/2 teaspoon kosher salt

1/4 teaspoon ground black pepper

3 tablespoons herbed garlic cream cheese, such as Boursin

6 hamburger buns, split

Oil for coating grill grate

The Grill

Gas: Direct heat, medium-high 425 F to 450 F; clean,

oiled grate

Charcoal: Direct heat, light ash; 12-by-12-inch charcoal

bed (about 3 dozen coals); clean, oiled grate on lowest

setting

Wood: Direct heat, light ash; 12-by-12-inch bed, 3 to 4

inches deep; clean, oiled grate set 2 inches above the fire

1. Heat the grill as directed.

2. Using your hands, mix the beef, garlic, salt, and pepper in a bowl until well blended; do not overmix. Using a light touch, form into 12 patties no more than 1/2-inch thick.

3. Put a portion (about 11/2 teaspoons) of cream cheese in the center of each of the 6 patties; top with the remaining patties and press together, taking care to seal the edges well. Refrigerate the burgers until the grill is ready.

4. Brush the grill grate and coat it with oil. Put the burgers on the grill, cover and cook for 9 minutes, flipping after 5 minutes, for medium-done (150 F, slightly pink). Add a minute per side for well-done (160 F).

5. To toast the buns, put them cut-sides down directly over the fire for the last minute of cooking.

6. If serving the burgers directly from the grill, serve on the buns. If the burgers will sit, even for a few minutes, keep the buns and burgers separate until just before eating.

No-Bake Cheesecake Eggs

Easter eggs in all their pastel glory come to mind when pondering an important holy day on the Christian calendar. Easter eggs are great to hide and fun to find, but when they come in the form of a tasty dessert, celebrations become that much more festive.

“No-Bake Cheesecake Eggs” are a confectionary twist on the chocolate eggs that are popular come Easter. Home chefs can have fun decorating and playing with the flavors of these treats. Try this recipe, courtesy of “Jane’s Patisserie Celebrate!” (Sourcebooks) by Jane Dunn.

No-Bake Cheesecake Eggs

Serves 2

Base

1 medium chocolate Easter egg

35 grams unsalted butter

75 grams digestive biscuits

Filling

200 grams full-fat soft cheese (such as cream cheese or neufchâtel), at room temperature

1/2 teaspoon vanilla extract

2 tablespoons icing sugar

100 milliliters double cream

25 grams cocoa powder

Decoration

50 grams milk chocolate, melted

Easter chocolates

Sprinkles

Base

Carefully split the Easter egg into two halves.

Melt the butter in the microwave in short bursts or in a small pan over a medium heat. In a food processor, blitz the biscuits to a fine crumb, add the melted butter and pulse a few times until the mixture is well combined.

Divide the mixture equally between the two halves of the Easter egg, and very gently press down, without breaking the shell.

Filling

In a large bowl, whisk the cheese, vanilla extract and icing sugar until smooth. Add the double cream and cocoa powder and whisk again until smooth and thickened. Divide the mixture evenly between the two Easter egg halves and smooth over as carefully as possible. Chill in the fridge for an hour or so until set.

Decoration

Drizzle the melted milk chocolate over the two halves and decorate with some Easter chocolates and sprinkles.

Irish Soda Bread

Irish cuisine may not be as widely recognizable or familiar across North America as Chinese, Italian or Mexican fare. But that doesn’t mean Irish food lacks fans and flavor. As the world prepares to celebrate St. Patrick’s Day on or around March 17, individuals who want to include some popular Irish fare in their festivities won’t want to exclude this recipe for “Irish Soda Bread” from AllRecipes.com.

Irish Soda Bread

Yields 1 1/2 loaf (20 servings)

Ingredients:

4 cups all-purpose flour

1/2 cup margarine, softened

4 tablespoons white sugar

1 teaspoon baking soda

1 tablespoon baking powder

1/2 teaspoon salt

1 cup buttermilk

1 egg

1/4 cup butter, melted

1/4 cup buttermilk

Directions:

1. Preheat the oven to 375 degrees F. Lightly grease a large baking sheet.

2. Mix flour, softened margarine, sugar, baking soda, baking powder, and salt together in a large bowl. Stir in 1 cup of buttermilk and egg. Turn dough out onto a lightly floured surface and knead slightly. Form dough into a round and place on the prepared baking sheet.

3. Combine melted butter with 1/4 cup buttermilk in a small bowl; brush loaf with this mixture. Use a sharp knife to cut an ‘X’ into the top of the loaf.

4. Bake in preheated oven until a toothpick inserted into the center of the loaf comes out clean, 45 to 50 minutes. Check to see if it is done after 30 minutes. You may continue to brush the loaf with the butter mixture while it bakes.

Cherry Pie Bars

Tart, red cherries and Valentine’s Day seem to be the perfect pair. Not only do cherries align with a Valentine’s Day color scheme, they even resemble little hearts when hanging from their stems.

Celebrating Valentine’s Day involves many different traditions, and enjoying decadent desserts is among them. Purchasing ready-made treats from a local bakery is one way to indulge in a sugary confection, but crafting a recipe at home is another way to show that special someone how much you care.

“Cherry Pie Bars” are not exactly a pie, but a pound cake with a cherry pie filling swirl. They can be made for many different occasions, but make for something sweet on Valentine’s Day. Whip up this recipe from “Butter, Flour, Sugar, Joy” (Sourcebooks) by Danielle Kartes.

Cherry Pie Bars

Yield: One 9-by-13-inch pan

2 cups sugar

1 cup butter, softened

4 eggs

2 cups all-purpose flour

1 teaspoon baking powder

1/2 teaspoon salt

1 21-ounce can cherry pie filling

Directions:

1. Preheat oven to 350 F. Line a 9-by-13-inch pan with parchment paper.

2. In a stand mixer, or with a hand mixer, cream sugar and butter on low. Add the eggs one at a time. Beat until just combined.

3. Add the flour, baking powder and salt. Spread a little over half the cake batter into the pan. Evenly spread the pie filling over the top, and spoon the rest of the cake batter over the pie filling. It’s fine if the cherries show through.

4. Bake 35 minutes or until the top has turned slightly golden. Do not overbake. Allow to cool and slice into squares.

Enjoy!

Blueberry Apple Pie

Pie is delicious any time of year, but especially when seasonal fruits are included in the recipe. When the weather cools down, mouthwatering apples are in season, making this an ideal time to enjoy some apple pie. Home chefs can use Peggy Brusseau’s, author of “The Contented Vegan” (Head of Zeus), recipe for “Blueberry Apple Pie” to create their own delicious dessert. This recipe is designed for those who adhere to a vegan diet, but bakers can substitute a traditional pie crust if desired.

Blueberry Apple Pie

Makes 1 large pie

Ingredients:

1 quantity Vegan Shortcrust Pastry (see below)

2 medium apples

2 1/4 pounds fresh blueberries

1/4 cup granulated sugar

2 tablespoons all-purpose flour

(Alternative: Use 1 tablespoon oat bran instead of the flour)

Directions:

1. Preheat the oven to 350 F. Line an 11 1/4 inch pie dish with half of the pastry, and prepare the top crust.

2. Peel, core and slice the apples. Spread the apple slices over the bottom of the pastry base. Tip the blueberries into the pie dish, and spread evenly to cover the apples.

3. Mix together the sugar and flour in a small bowl, and sprinkle the mixture evenly over the berries.

4. Position the prepared top crust over the pie, seal together the edges of the pastry and pierce the top crust with a fork or knife.

5. Bake for 25 to 30 minutes until the pastry is golden and crisp. Cool and serve.

Vegan Shortcrust Pastry

Makes top and bottom pie crust

Ingredients:

1 cup all-purpose flour, plus extra for dusting

2 3/4 ounces coconut oil

1/3 cup fine cornmeal

Directions:

1. Measure the flour into a large bowl. Add the coconut oil and ‘cut’ it into the flour, using a fork or table knife, to create an even texture throughout. Add the cornmeal, working it in the same way to create an even texture.

2. Add 1/2 cup ice cold water, and quickly work it into the dough with your fingertips. Shape the dough into a ball, cover the bowl and chill in the refrigerator for at least 1 hour, and up to 24 hours.

3. Remove the pastry from the refrigerator 20 to 30 minutes before use, and bring to room temperature. Lightly flour your work surface and a rolling pin. Keep a little extra flour to one side, to use as needed.

4. Divide the dough in two, and knead one portion on the work surface to ensure an even consistency. Roll out the pastry into a round or rectangle, as required, to a thickness of 1/4 inch.

5. Lift the pastry into the pie dish and press into place, trimming off any excess. Roll the remaining pastry in the same way, to make the top crust, or to line a second pie dish.